In this article, we will learn how to create a bar chart at an angle of 12 using ng2-charts. Here, I will explain how to create an angular 12 project in Visual Studio 2019 and install the npm ng2-charts package using the package manager console. I will also explain the way to upgrade your old version of angular with the latest version of angular so you can update your angular project or application.
In my previous articles I explained AngularJS pie chart using the Highcharts library with a sample and how to draw charts using JavaScript with samples, as well as a rough 12 angular sample with a web API you may want to read.
I have noticed a lot of developers, programmers and also students, especially those who are beginners, often encounter difficulties while working with angles charts, whether in version update, data union, installing npm packages etc.
A few days ago I received an email from one of my readers, she was a student and she needed help creating a bar chart in her angular project, as she was having trouble installing the npm package as well as tying the data. I created an angled demo app to help her, so in this article, I want to share the demo app with all the developers as well as with the student community so that necessary student developers can get help from this article.
demand
- Create a new Angular 12 application.
- Install the ng2-charts npm package using the package manager console.
- Create a bar chart using ng2-charts
Implementation
We will start with an example of students, we will create a column chart for students to grade / score wisely on the subject.
So, first, we must Angular CLI device Into our system, if you have already installed an angular CLI on your system, you can skip this step.
To, install the Angular CLI Open Package Manager Console From the visual studio or open the command line and type the command below, and press Enter.
npm install - g @angular/CLI
Note: If you are facing any issues related to npm, you need to download and install the active LTS, or maintain the LTS version of Node.js.
If you are running an older version of angular and want uUpdate your angular application with the latest version Of angular you can use the following command:
ng update @angular/core @angular/cli --force
ng update @angular/material --force
Now, we need to create a new angular project.
Create a new angular project
Create an open package manager console for a new angular project from Visual Studio, type the following command and press Enter.
Here, Codingville Is the name of our Angular project.
Install the ng2-charts npm package in Angular Project
To install the ng2-charts npm package, you can use the following command:
npm install ng2 - charts@2.2.3 --save
npm install chart.js@2.9.3 --save
You can also check out package.json File in the angular project to validate the installed packages.
package.json
{
  "name": "codingvila",
  "version": "0.0.0",
  "scripts": {
    "ng": "ng",
    "start": "ng serve",
    "build": "ng build",
    "watch": "ng build --watch --configuration development",
    "test": "ng test"
  },
  "private": true,
  "dependencies": {
    "@angular/animations": "~12.0.2",
    "@angular/common": "~12.0.2",
    "@angular/compiler": "~12.0.2",
    "@angular/core": "~12.0.2",
    "@angular/forms": "~12.0.2",
    "@angular/platform-browser": "~12.0.2",
    "@angular/platform-browser-dynamic": "~12.0.2",
    "@angular/router": "~12.0.2",
    "chart.js": "^2.9.3",
    "ng2-charts": "^2.2.3",
    "rxjs": "~6.6.0",
    "tslib": "^2.1.0",
    "zone.js": "~0.11.4"
  },
  "devDependencies": {
    "@angular-devkit/build-angular": "~12.0.2",
    "@angular/cli": "~12.0.2",
    "@angular/compiler-cli": "~12.0.2",
    "@types/jasmine": "~3.6.0",
    "@types/node": "^12.11.1",
    "jasmine-core": "~3.7.0",
    "karma": "~6.3.0",
    "karma-chrome-launcher": "~3.1.0",
    "karma-coverage": "~2.0.3",
    "karma-jasmine": "~4.0.0",
    "karma-jasmine-html-reporter": "^1.5.0",
    "typescript": "~4.2.3"
  }
}
explanation
As you can see in the package.json file, look at the dependency that indicates the npm chart.js package, as well as the ng2-charts, have been successfully installed.
Now, we need to import the chart module, for that, you need to open the app.module.ts The Witch file is in the following directory Codingvila >> src>> App >> app.module.ts.
Now, write the following code to the app.module.ts file.
app.module.ts
import { NgModule } from '@angular/core';
import { BrowserModule } from '@angular/platform-browser';
import { FormsModule } from '@angular/forms';
import { ChartsModule } from 'ng2-charts';
import { AppComponent } from './app.component';

@NgModule({
  declarations: [
    AppComponent
  ],
  imports: [
    BrowserModule,
    FormsModule,
    ChartsModule
  ],
  providers: [],
  bootstrap: [AppComponent]
})
export class AppModule { }
explanation
As can be seen in the code of the app.module.ts file as written above, here we will import a ChartsModule M e ng2- Charts And imported a FormsModule M e @ Angular / Shapes.
Similarly, we need to update our app.component.ts file, which is in the following directory Codingvila> src> app> app.component.ts.
Write the following code into app.component.ts
app.component.ts
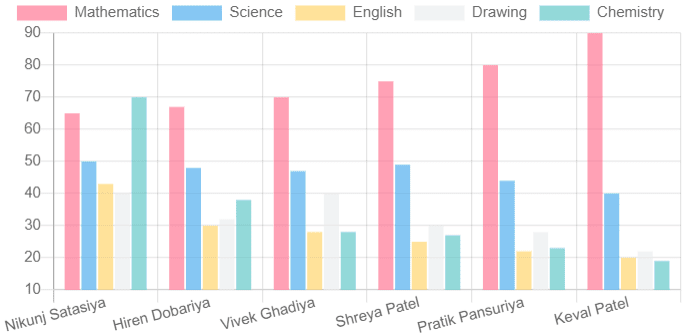
import { Component } from '@angular/core';
import { ChartDataSets } from 'chart.js';
import { ChartOptions, ChartType } from 'chart.js';
import { Label } from 'ng2-charts';

@Component({
  selector: 'app-root',
  templateUrl: './app.component.html',
  styleUrls: ['./app.component.css']
})
export class AppComponent {
  title = 'Codingvila';
  public chart_Options: ChartOptions = {
    responsive: true,
  };
  public chart_Labels: Label[] = ['Nikunj Satasiya', 'Hiren Dobariya', 'Vivek Ghadiya', 'Shreya Patel', 'Pratik Pansuriya', 'Keval Patel'];
  public chart_Type: ChartType = 'bar';
  public chart_Legend = true;
  public chart_Plugins = [];

  public chart_Data: ChartDataSets[] = [
    {
      data: [65, 67, 70, 75, 80, 90],
      label: 'Mathematics'
    },
    {
      data: [50, 48, 47, 49, 44, 40],
      label: 'Science'
    },
    {
      data: [43, 30, 28, 25, 22, 20],
      label: 'English'
    },
    {
      data: [40, 32, 40, 30, 28, 22],
      label: 'Drawing'
    },
    {
      data: [70, 38, 28, 27, 23, 19],
      label: 'Chemistry'
    },
  ];

  constructor() { }

  ngOnInit() {
  }
}
explanation
As you can see in the code above, here we will import the ChartDataSets, ChartOptions, And ChartType From the installed npm package chart.js And a label for the column chart imported from ng2-charts. Here, we took the Student name as label of bar chart And assign JSON Data as a data set containing Grades / grade of a particular student. In this example, we have created a JSON static data set for demonstration, you can retrieve the JSON data array From your service or from your web API based on your requirement.
Now, we will design our HTML page, for that you need to open the app.component.html file located in the following directory Codingvila> src> app> app.component.html.
app.component.html
<style>
  :host {
    font-family: -apple-system, BlinkMacSystemFont, "Segoe UI", Roboto, Helvetica, Arial, sans-serif, "Apple Color Emoji", "Segoe UI Emoji", "Segoe UI Symbol";
    font-size: 14px;
    color: #333;
    box-sizing: border-box;
    -webkit-font-smoothing: antialiased;
    -moz-osx-font-smoothing: grayscale;
  }

  .toolbar {
    position: absolute;
    top: 0;
    left: 0;
    right: 0;
    height: 60px;
    display: flex;
    align-items: center;
    background-color: #223c88;
    color: white;
    font-weight: 600;
  }
  .logo{padding-left:20px;
        font-size: large;
  }

  .chart {
    width: 800px;
    height: 1100px;
    display: block;
    padding-top:100px;
    padding-left:30px;
  }

  @media screen and (max-width: 575px) {
    svg#rocket-smoke {
      display: none;
      visibility: hidden;
    }
  }
</style>

<div class="toolbar" role="banner">
  <span class="logo">Codingvila | Angular 12</span>
  <div class="spacer"></div>
</div>

<div class="chart">
  <canvas baseChart
          [datasets]="chart_Data"
          [labels]="chart_Labels"
          [options]="chart_Options"
          [plugins]="chart_Plugins"
          [legend]="chart_Legend"
          [chartType]="chart_Type">
  </canvas>
</div>
explanation
As you can see in the HTML code above, we first wrote a CSS class to give the appropriate user interface for our angular application, then we created the column chart using the canvas tag, and assigned the appropriate properties, as properties where we assigned an entry in the app.component.ts file.
Now, we need to build and run our angular project, to build the angular project you need to write the following command in the package manager console.
Construction of an angular project
Launch the Angular project
When you press Enter your angular project will continue to run URL: http: // localhost: 4200 /
Productivity

Summary
In this article, we learned about the bar chart in angular 12 implementation using ng2-charts and also learned how to update the latest version of angular etc.
You can download the source code from here if you want to practice creating a bar chart in the Angular 12 application using ng2-charts.
.